# Installation
A step-by-step guide to get the Claude Code Agent Monitor up and running on your machine, with optional sections for importing history and running in a container.
## Fastest path — install it as a Claude Code plugin
If all you want is a working dashboard, skip every step below. From Claude Code:
```
/plugin marketplace add Smartgift-AI/Claude-Code-Monitor
/plugin install ccam@claude-code-agent-monitor-plugins
```
The next session start installs the hooks, boots the server, puts the `ccam` CLI
on PATH and connects the MCP tools — no clone, no `npm run setup`, no
`npm run install-hooks`, no manual `npm start`. Run `/ccam-doctor` to check the
result and `/ccam-open` to build the UI and get the URL.
Requires Node **>= 22.5** (a plugin install has no native `better-sqlite3`, so
the server stores data through `node:sqlite`). Full behavior, including the
uninstall cleanup, is in [`docs/PLUGINS.md`](docs/PLUGINS.md).
Follow the steps below instead when you want a checkout — to develop the
dashboard, run it from source, or stay on Node 20.
## Requirements
| Requirement | Version | Notes |
|---|---|---|
| Node.js | 20+ (22+ recommended) | Required for server and client |
| npm | 9+ | Comes with Node.js |
| Claude Code | 2.x+ | Required for hook integration |
| Python | 3.6+ | Optional — statusline utility only |
| Git | Any | For cloning the repository |
---
## Step 1 — Clone the repository
```bash
git clone https://git.smartgift.io.vn/Smartgift-AI/Claude-Code-Monitor.git
cd Claude-Code-Agent-Monitor
```
---
## Step 2 — Install dependencies
```bash
npm run setup
```
This installs all server and client dependencies, plus the VS Code extension, and links the `ccam` CLI.
A plain root install already covers server **and** client — a `postinstall` hook installs the client dependencies automatically, so this alone is enough to build and run the dashboard:
```bash
npm install
```
`npm run setup` additionally installs the VS Code extension and links the `ccam` CLI. (If you install with `--ignore-scripts`, the `postinstall` hook is skipped — run `cd client && npm install` manually in that case.)
Or via Makefile (also installs MCP dependencies):
```bash
make setup
```
---
## Step 3 — Start the dashboard
```bash
npm run dev
```
This starts two processes concurrently:
| Process | URL | Description |
|---|---|---|
| Express server | http://localhost:4820 | API, WebSocket, SQLite |
| Vite dev server | http://localhost:5173 | React frontend with HMR |
Open **http://localhost:5173** in your browser.
> [!TIP]
> When you run the dashboard directly on the host with `npm run dev` or `npm start`, the server automatically writes the Claude Code hook configuration to `~/.claude/settings.json`. If you run the dashboard in Docker or Podman, install hooks from the host with `npm run install-hooks` after the container is up.
---
## Step 4 — Start a Claude Code session
Start a new Claude Code session from any directory **after** the dashboard server is running. The hooks will fire automatically and your sessions, agents, and events will appear in real-time.
```bash
# In a separate terminal, from any project directory:
claude
```
---
## Verification
After starting a Claude Code session, you should see:
- **Sessions page** — your session listed with status `Waiting` (a fresh CLI sitting at the prompt) or `Active` (mid-turn)
- **Agent Board** — a `Main Agent` card in the `Waiting` column until you type your first message; it flips to `Working` on `UserPromptSubmit` / `PreToolUse` and back to `Waiting` after each `Stop`
- **Activity Feed** — events streaming in as Claude Code uses tools
- **Dashboard** — stats updating in real-time
- **Settings page** — model pricing rules, hook configuration status, data export and cleanup tools
If nothing appears after 30 seconds, see [SETUP.md](./SETUP.md#troubleshooting).
### PWA install (optional)
The dashboard is a Progressive Web App. After opening it in a supported browser (Chrome, Edge, Firefox), you can install it to your dock / home screen:
1. Look for the **install icon** (⊕) in the browser address bar, or open the browser menu → "Install app"
2. Once installed, the dashboard launches in its own window with no browser chrome
3. Offline support: previously visited pages and assets are served from the Service Worker cache when the network is unavailable
The landing page and wiki are also installable PWAs with their own manifests and service workers — visit each in a browser to install independently.
---
## Step 5 — (Optional) Import existing Claude Code history
The server **automatically imports** every session under
`~/.claude/projects/` on startup, so if you've used Claude Code on this
machine before, your historical sessions, agents, events, token counts,
and cost totals should already be visible in the Sessions list.
To bring in history from another machine, a backup, or a `.tar.gz`
archive a teammate sent you, use **Settings → Import History** in the
UI. It supports three modes:
```mermaid
flowchart LR
UI["Settings →
Import History"] --> M1["Rescan default folder
~/.claude/projects"]
UI --> M2["Scan a folder
any absolute path"]
UI --> M3["Upload files
.jsonl / .zip / .tar.gz / .gz"]
M1 --> P["Same parser as live
hook ingestion"]
M2 --> P
M3 --> P
P --> DB[("SQLite
sessions + tokens + cost")]
style UI fill:#a855f7,stroke:#c084fc,color:#fff
style P fill:#f59e0b,stroke:#fbbf24,color:#000
style DB fill:#10b981,stroke:#34d399,color:#fff
```
Re-imports are idempotent: sessions are deduplicated by UUID and
compaction baselines preserve pre-compaction token totals, so running
the importer twice never double-counts tokens or cost.
Verify it worked by opening the **Analytics** page and checking that
per-model token totals and estimated cost look correct. Full walkthrough
with per-OS archive commands in
[SETUP.md → Importing existing Claude Code history](./SETUP.md#importing-existing-claude-code-history).
### Optional: tune import limits
If you regularly import very large archives, these environment variables
can be raised (the defaults are generous for typical use):
| Variable | Default | Purpose |
| --------------------------------- | ------- | ----------------------------------------------------------- |
| `CCAM_IMPORT_MAX_BYTES` | 1 GB | Maximum size per uploaded file |
| `CCAM_IMPORT_MAX_FILES` | 2000 | Maximum files per upload request |
| `CCAM_IMPORT_MAX_EXTRACT_BYTES` | 4 GB | Ceiling on uncompressed bytes per archive (zip-bomb guard) |
Set them before `npm run dev` or `npm start`:
```bash
CCAM_IMPORT_MAX_EXTRACT_BYTES=17179869184 npm start # allow 16 GB extraction
```
---
## Production mode
To run as a single process serving the built client:
```bash
npm run build # Build the React client
npm start # Start Express serving client/dist on port 4820
```
Open **http://localhost:4820** in your browser.
---
## Optional: Local MCP server
If you want AI agents to call dashboard functionality through MCP tools, run the local MCP server in `mcp/`:
```bash
npm run mcp:install
npm run mcp:build
npm run mcp:start # stdio (for MCP host integration)
npm run mcp:start:http # HTTP + SSE server on port 8819
npm run mcp:start:repl # interactive CLI with tab completion
```
The MCP server supports three transport modes:
```mermaid
graph LR
HOST["MCP Host
(Claude Code / Desktop)"] -->|"stdin/stdout"| STDIO["stdio mode
mcp:start"]
RC["Remote Client"] -->|"POST /mcp
GET /sse"| HTTP["HTTP mode
mcp:start:http
:8819"]
OP["Operator"] -->|"interactive CLI"| REPL["REPL mode
mcp:start:repl"]
STDIO --> API["Dashboard API
http://127.0.0.1:4820/api/*"]
HTTP --> API
REPL --> API
style STDIO fill:#6366f1,stroke:#818cf8,color:#fff
style HTTP fill:#f59e0b,stroke:#fbbf24,color:#000
style REPL fill:#a855f7,stroke:#c084fc,color:#fff
```
See [mcp/README.md](./mcp/README.md) for host config, tool catalog, and safety flags.
To build the MCP server as a container image instead:
```bash
npm run mcp:docker:build
# or
npm run mcp:podman:build
```
---
## Optional: Agent extension packs
This repository includes extension packs for both Claude Code and Codex.
- Claude Code loads project extensions from:
- `CLAUDE.md`
- `.claude/rules/`
- `.claude/skills/`
- `.claude/agents/`
- Codex project packs live under `.codex/`:
- `AGENTS.md`
- `.codex/rules/`
- `.codex/agents/`
- `.codex/skills/`
See [`.codex/README.md`](./.codex/README.md) for Codex extension details.
---
## Optional: VS Code extension
The **Claude Code Agent Monitor** is also available as a dedicated VS Code extension for seamless, integrated monitoring.
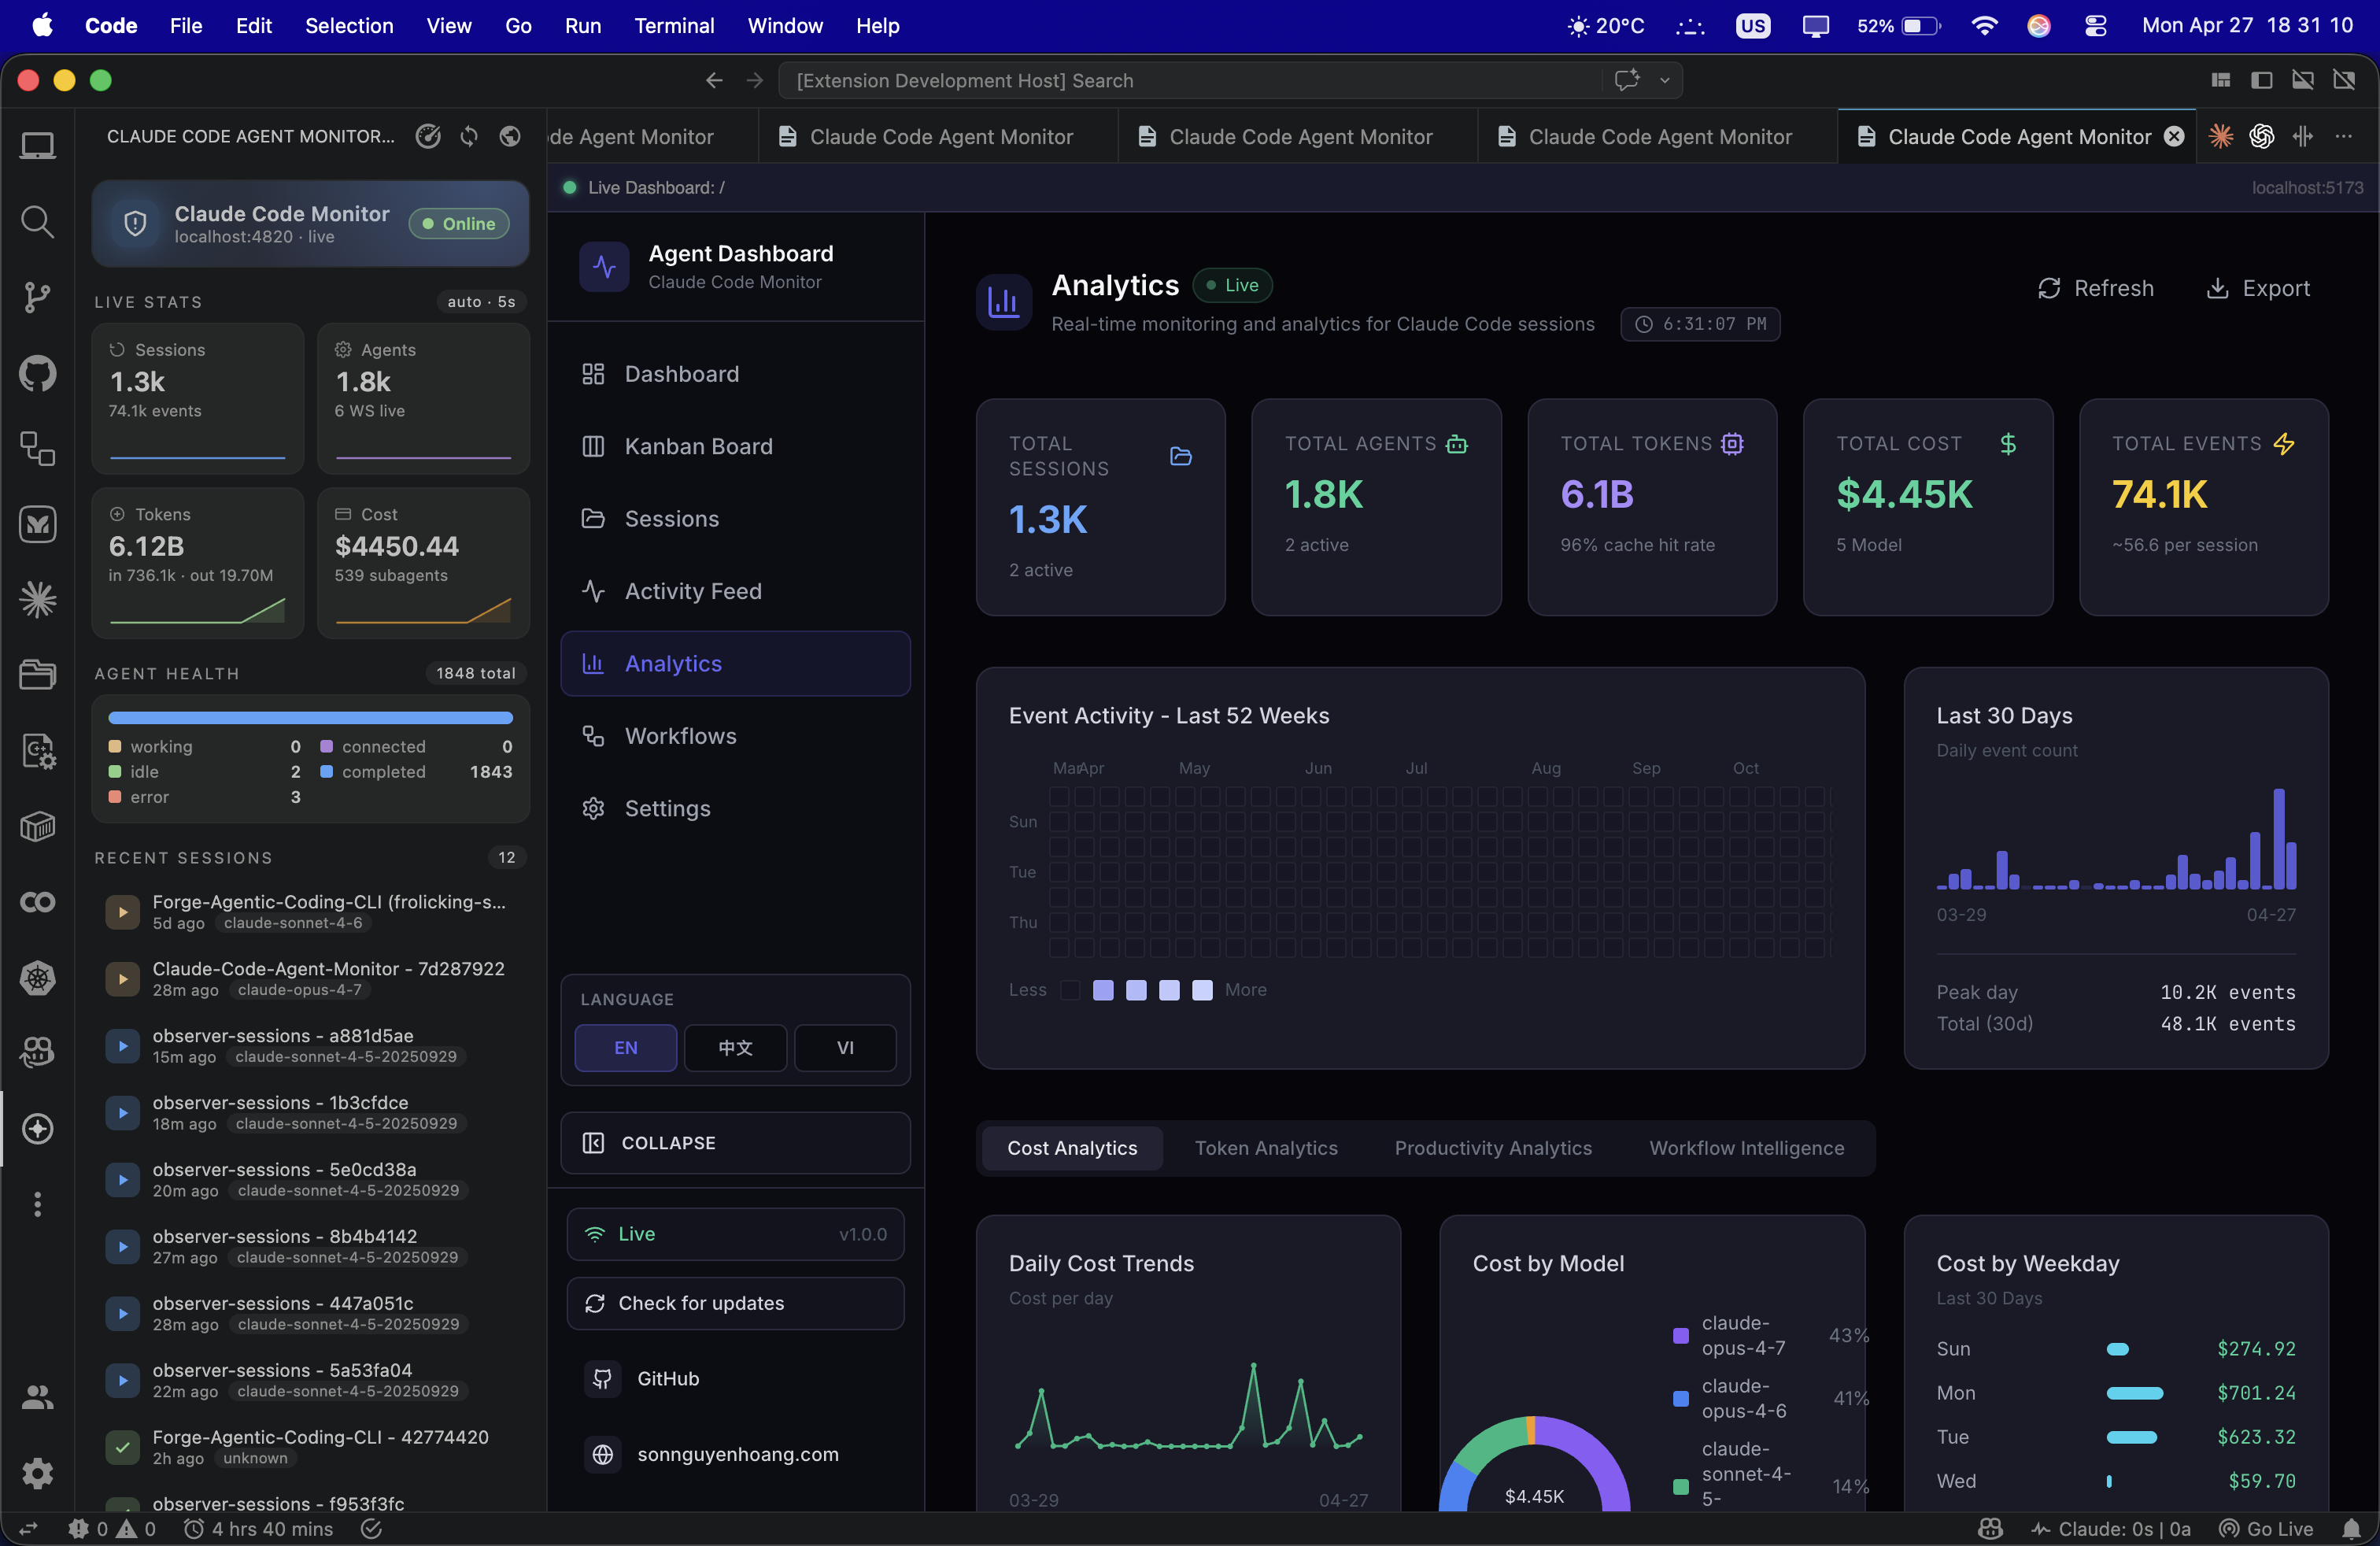
### Features
- **Real-time Sidebar**: Monitor agent status, health, and usage stats in the Activity Bar.
- **Pulse Status Bar**: High-level session and agent counts in the bottom status bar.
- **Direct Navigation**: Jump to specific dashboard pages or recent sessions.
- **Embedded Dashboard**: Full dashboard interface within a native VS Code tab.
### Installation
1. Open the [vscode-extension](./vscode-extension) folder in VS Code.
2. Install via the Marketplace or package it manually:
```bash
cd vscode-extension
npm install
# Generate .vsix for local install
npm run package
```
3. After installation, ensure the main dashboard server is running (`npm run dev`).
4. Look for the **Radar icon** in your VS Code Activity Bar.
For advanced configuration, refer to the [.vscode](./.vscode) and [vscode-extension](./vscode-extension) directories.
> [!TIP]
> Extension on VS Code Marketplace: [Claude Code Agent Monitor](https://marketplace.visualstudio.com/items?itemName=hoangsonw.claude-code-agent-monitor)
---
## Container mode (Docker / Podman)
The repository includes both a multi-stage `Dockerfile` and a `docker-compose.yml` file. Docker and Podman are both supported.
### Compose
```bash
# Docker Compose
docker compose up -d --build
# Podman Compose
CLAUDE_HOME="$HOME/.claude" podman compose up -d --build
```
Open **http://localhost:4820** in your browser.
### Plain Docker / Podman
```bash
# Docker
docker build -t agent-monitor .
docker run -d --name agent-monitor \
-p 127.0.0.1:4820:4820 \
-v "$HOME/.claude:/root/.claude:ro" \
-v agent-monitor-data:/app/data \
agent-monitor
# Podman
podman build -t agent-monitor .
podman run -d --name agent-monitor \
-p 127.0.0.1:4820:4820 \
-v "$HOME/.claude:/root/.claude:ro" \
-v "$HOME/.claude/agent-dashboard:/app/data" \
agent-monitor
```
### Container notes
| Mount | Purpose |
|---|---|
| `~/.claude:/root/.claude:ro` | Lets the server import legacy Claude session history |
| `~/.claude/agent-dashboard:/app/data` | **Canonical SQLite database** (shared with native installs) |
> [!NOTE]
> The image sets `DASHBOARD_HOST=0.0.0.0` and `DASHBOARD_DATA_DIR=/app/data` internally (baked into the `Dockerfile`). The `0.0.0.0` bind is required because a container's loopback is a separate namespace the published port cannot reach; `/app/data` is bind-mounted to `~/.claude/agent-dashboard` on the host so Docker uses the same database as `npm start`. The trust boundary is the **host** port publish — the examples use `-p 127.0.0.1:4820:4820`, so the dashboard is local-only. To expose it on a LAN, publish on `0.0.0.0` (`-p 4820:4820`) **and** set `DASHBOARD_TOKEN`.
> [!IMPORTANT]
> Claude Code hooks run on the host, not inside the container. After the container is healthy on `http://localhost:4820`, run `npm run install-hooks` on the host so Claude Code posts hook events back to the containerized server. The installer refuses to run inside a container (issue #193) to avoid writing a container-internal handler path into a bind-mounted `~/.claude`; use `CCAM_ALLOW_CONTAINER_HOOKS=1` only if you run Claude Code inside the same container.
---
## Troubleshooting
### `npm run setup` shows `better-sqlite3` errors
This is expected and **non-fatal**. `better-sqlite3` is a native C++ module listed as an optional dependency. If prebuilt binaries are not available for your Node version or platform, npm will print gyp/compilation errors but still complete successfully.
At runtime the server uses this fallback chain:
1. **`better-sqlite3`** — used when prebuilt binaries are available (Node 20/22/24 on Windows x64, macOS arm64/x64, Linux x64/arm64)
2. **`node:sqlite`** — Node.js built-in SQLite module, used automatically on Node 22+ when `better-sqlite3` is unavailable
If you see an error box at startup saying *"SQLite backend not available"*, either:
- **Upgrade to Node.js 22+** (recommended — zero native dependencies needed), or
- **Install build tools** so `better-sqlite3` can compile from source:
- **Windows:** `npm install -g windows-build-tools` or install [Visual Studio Build Tools](https://visualstudio.microsoft.com/visual-cpp-build-tools/) with the C++ workload
- **macOS:** `xcode-select --install`
- **Linux:** `sudo apt install python3 make g++` (Debian/Ubuntu) or equivalent
Then run: `npm rebuild better-sqlite3`
### `npm run dev` fails immediately
Ensure both server and client dependencies are installed:
```bash
npm run setup
```
If the error mentions a missing module like `express` or `react`, dependencies may be incomplete. Delete `node_modules` in both root and `client/`, then re-run setup:
```bash
rm -rf node_modules client/node_modules
npm run setup
```
### Server starts but client shows a blank page
The Vite dev server and Express server run on different ports. Make sure both are running (`npm run dev` starts both). Open **http://localhost:5173**, not `http://localhost:4820`, during development.
### No sessions appearing after starting Claude Code
See [SETUP.md — Troubleshooting](./SETUP.md#troubleshooting) for detailed hook debugging steps.
---
## Ports
| Service | Default | Override |
|---|---|---|
| Dashboard server | `4820` | `DASHBOARD_PORT=xxxx npm run dev` |
| Client dev server | `5173` | Edit `client/vite.config.ts` |